Kindly follow the below steps to open the Virtual Line subscription first.
Log in your account
Ensure that you are using the right company account
Click on the arrow icon on the left sidebar. Then, click to open the Virtual Line

Virtual Line has following main commands:
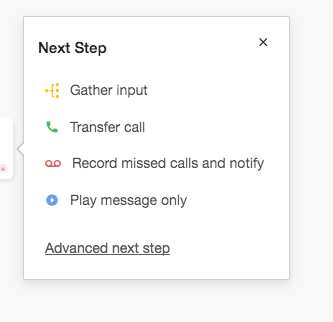
Gather input: allows the callers to reach the right person they wanted to meet after a welcome message.
Transfer call: allows calls to be forwarded to a preferred number directly.
Record missed calls and notify: allows callers to record a voicemail and you will receive this voice message via your e-mail.
Play message only: allows you to attach or type in an automated message for your callers to hear.
Advanced steps:
Set condition: allows you to set some specific rules to forward the calls
Confirm: allows your customer to press 1 confirm their action or press any digit to come back the previous step.
1. Gather input: Set Greeting Message + Configure extensions
a. Set greeting message
Select Set extensions
On the pop-up panel, you can choose to play the Greeting Message via Text to speech or upload your own MP3 file
Select language > Enter your message
Click "Make a phone call" to hear your message (A call will be made to the specified number and there will be deducted from your credits)
You can set unlimited extensions; however, the welcome message is currently limited to 450 characters.

b. Configure extensions

Enter the extension number
Choose an Extension Type (can be one of the 6 VL commands): Select command > Enter phone number/ bizphone extension to receive forwarded calls or e-mail to receive voice mail.
Click the box to Display your VL number as Caller ID. Otherwise, caller ID will be the real number of caller.
Caller ID prefix: to add some digits (Max 4) in front of the caller ID to create a customized one. For ex, caller ID is 6511223344 and CallerID prefix is 99; the final caller ID will be 996511223344
Click on Create when finished.

2. Transfer Call
Select Transfer call
Redirect to: choose either Bizphone (forward to bizphone extensions), Wallboard (a specific queue) or Phone number
Key in the destination numbers or bizphone extensions that receive the forwarded call in the box
Create
2.1. Transfer to Bizphone
Select Bizphone extension and Create

2.2. Transfer to Wallboard
Select the queue(s) that you want to transfer the call to and Save

2.3. Transfer to phone number
Key in the number that the call would be transferred to.

3. Record voicemail & notify
- Email: to receive notification
- URL: the notification is posted back to your server and notified to your API so that you can send a customized message to your client
- Voicemail: turn on to enable it
- Recording message: turn on to record the message

4. Play message only

5 Set condition
Calls that satisfy a set of conditions will be forwarded to a specified destination (Bizphone extension, Wallboard queue or Phone number).
- Condition type: can be Length, Time of the incoming call number
- Extension type: can be one of the 6 VL commands

6. Confirm
Press 1 to confirm the option or other digits to come back to the previous step

** Configure missed call notification
Missed call notification is available when you choose Transfer to command.

The configuration can be one of the 6 commands of Virtual Line and a special one: Forward to
When you choose Forward to, the instruction is as below:

Example:
Missed call notification is set after call is transferred to block 3. Call is triggered after 15 seconds, comes back to block 2 for 2 times. At the third time, the call is completely missed and a message is played only (block 5).
Configuration:

Result:
